

How To Change Background Color In Google Slides
When working on a Google Slides presentation, there are times when yous don't want to utilize the standard white background. Perhaps y'all may desire to pause the monotony, or maybe you want your presentation to stand out. Whatever the case may exist, to do that you need to know how to change the background in Google Slides!
To alter the background of a slide in Google Slides, first, select the slide and right-click on it. From the options that announced, click on the "Change Background" option. A new window volition pop upwardly. Hither, you can modify the color or add an image every bit the background of a slide.
In this commodity, we shall take a detailed expect at the process of changing the background of a slide in Google Slides. Plus, I'll also share with you three different but easy methods to add an paradigm every bit a background to your Slides!
So, allow's get started!
one. How to Change Background Color of Slide in Google Slides?
The process of irresolute the background color of your Google Slides presentation is described in easy steps below.
Footstep-i: Select the "Change Groundwork" choice
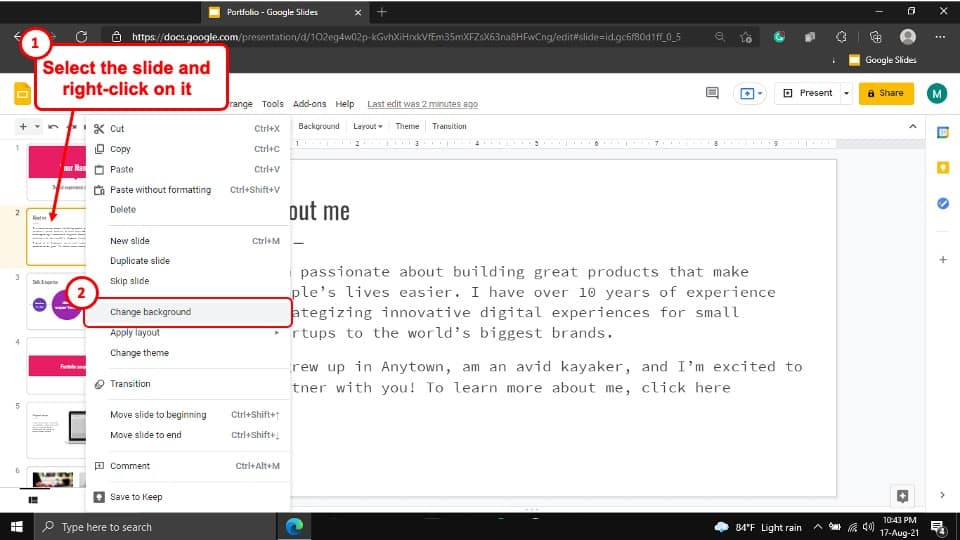
To begin, "Right-click" on the slide that y'all want to alter the groundwork color of and select the "Change Background" option from the carte du jour that will appear on your screen.
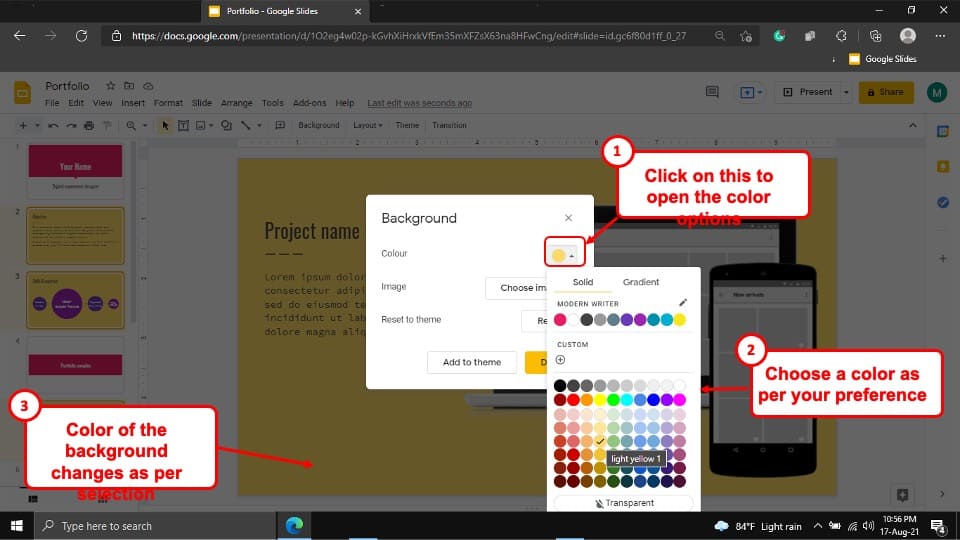
Step-ii: Click on the "Color" choice
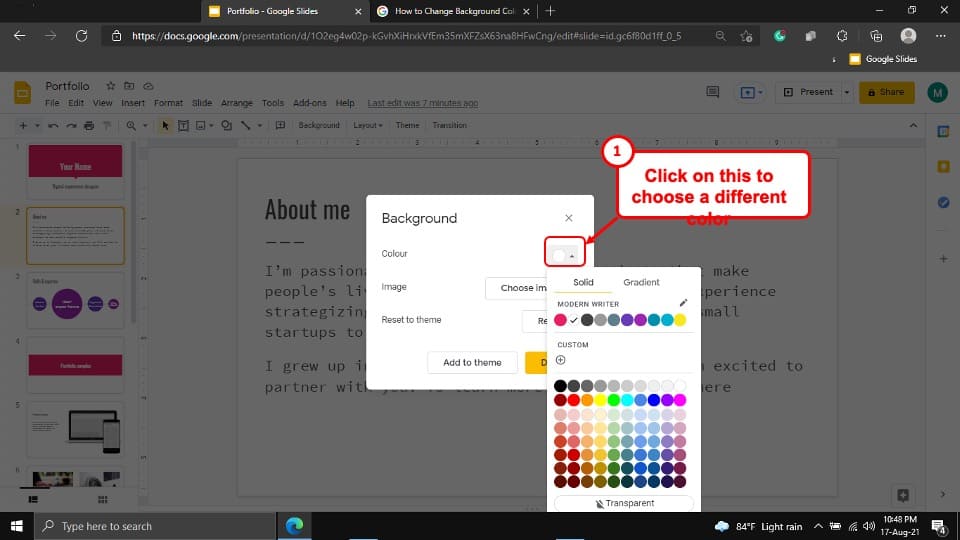
In one case you have selected the "Change Background" option from the carte du jour, a pop-upwards window volition appear at the center of your screen. Click on the box with a white circle on it, which is the "Color" option.
This will give you more color options to choose from.
Footstep-3: Select your preferred color
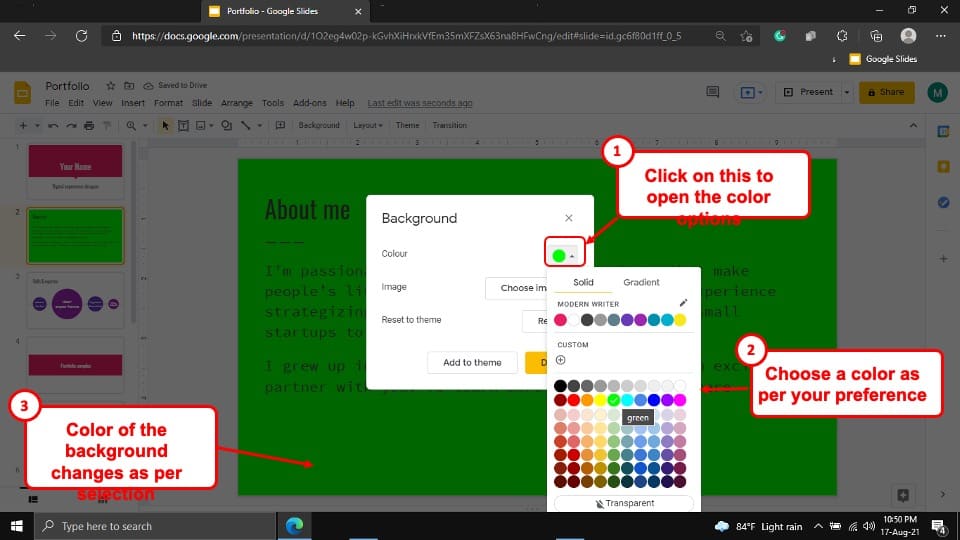
Google Slides will provide you with several different colors options from which you lot can choose the one yous like.
Simply click on your preferred color as a background for the slide and the colour of the background of that slide will change appropriately.
two. How to Change Groundwork of Multiple Slides in Google Slides?
To alter the background of Multiple slides in your Google Slides presentation, you have to select the slides together. The whole procedure is described in the like shooting fish in a barrel steps below.
Step-i: Select the multiple slides
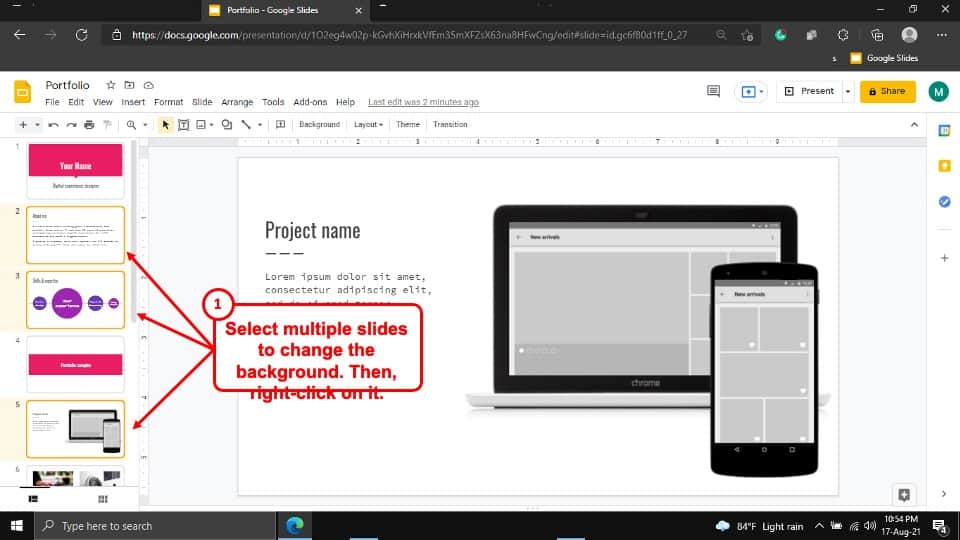
The first step of the procedure is to select multiple slides simultaneously.
To exercise this, all you have to do is to hold the "Ctrl" key on your keyboard and click on the slides that you want to change the background color of.
One time you printing the "Ctrl" fundamental and select the slides individually, y'all will observe that the selected slides are highlighted with a yellow edge effectually them. This will mean that the slides are selected.
Step-2: Select the "Change Background" option
Once the slides are selected, simply right-click on any one of the selected slides. This will open up a carte. From the carte, simply choose the "Alter Background" selection.
This will open a pop-up window.
Step-three: Choose a Background Color for the Slides
Now the process becomes identical to the procedure explained in the previous department of this article.
Click on the "Colour" option. A dropdown menu with an array of colors volition appear. Just choose a colour that you similar.
Afterward you have selected the colour, the background of the slides will change accordingly.
3. How to Add Image as Background in Google Slides?
At that place are two ways in which yous can add an image and change the groundwork in Google Slides.
You can either insert the image directly from the "Modify Groundwork" option in the drop-downward menu of the slide. Alternatively, you can use the "Slide Primary" view to add an epitome in the groundwork of the layout the slide is using.
Both of the methods are explained in the following department.
Method 1 – Using the Slide Primary
Using the "Slide Principal" to add together an epitome to your slide works slap-up when you want to add an image to every slide in one go!
You can add together an image equally a background in your Google Slides presentation by using the "Slide Master" view. This will add the image in the layout of the slide and tin be reused by adding a new slide with that layout.
The whole process is explained step-by-step style below.
Stride-1: Go to the "Slide Principal" view
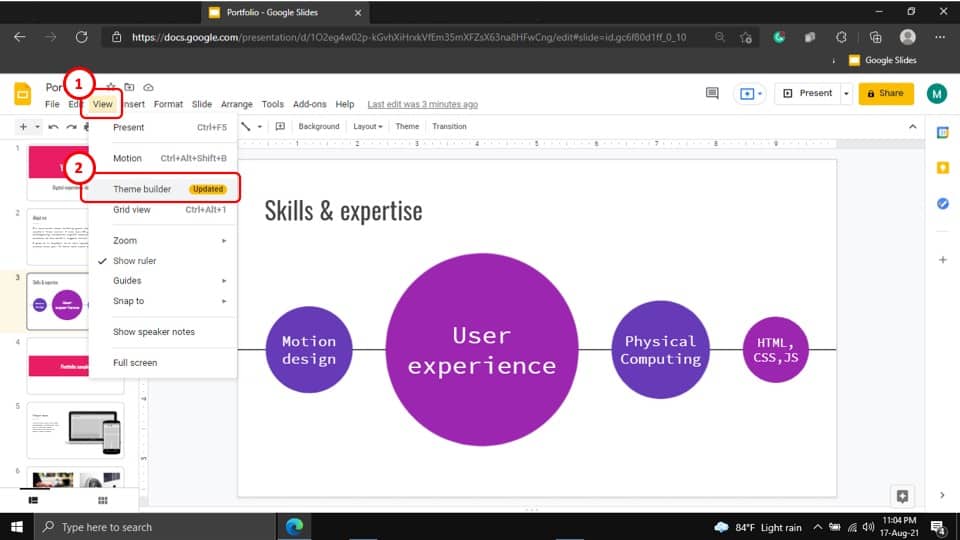
The get-go pace of calculation an image as the background of a slide in your Google Slides presentation is to select the "Theme Builder" option from the "View" tab.
Step-2: Select the "Change background" option
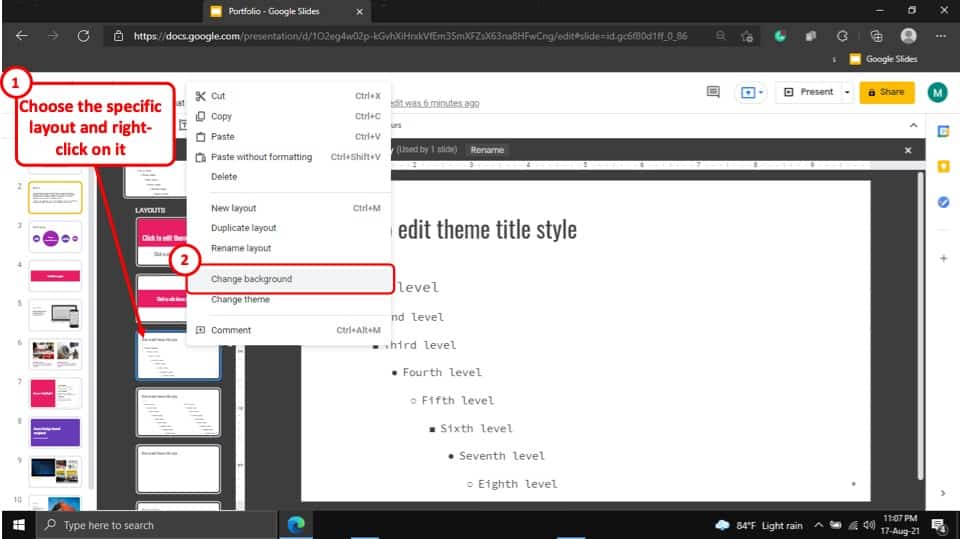
Later you take selected the "Theme Builder" choice, the view of your Google Slides presentation will switch to the "Slide Master" view.
From the slide navigation bar of the "Slide Main" view, find the layout that the slide is using and "Right Click" on it. This will open a drop-down menu. From the drop-down carte, select the "Change Background" option.
Step-3: Select the "Choose Epitome" option
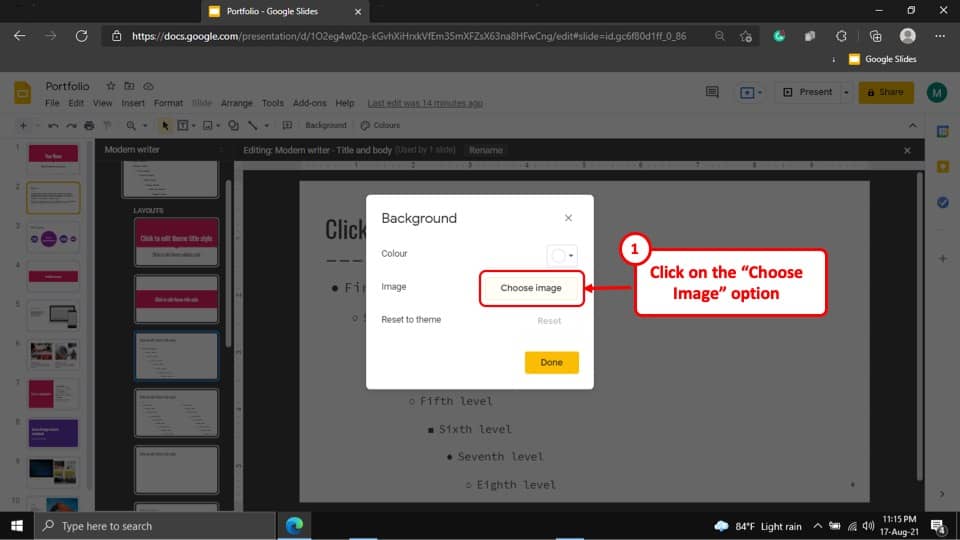
After you select the "Change Groundwork" selection, a popular-upwards window will appear on your screen. From the pop-up window, select the "Choose Image" option.
Step-4: Click on the "Browse" option

By clicking on the "Choose Prototype" selection, another pop-up window will appear on your screen. Select the bluish "Browse" selection. This will open a new pop-up window on your screen.
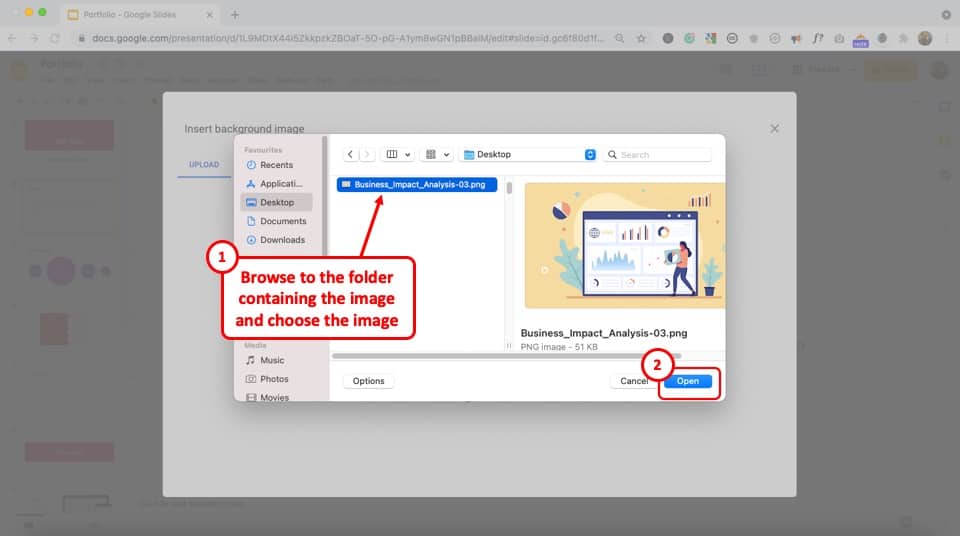
Step-5: Select the image
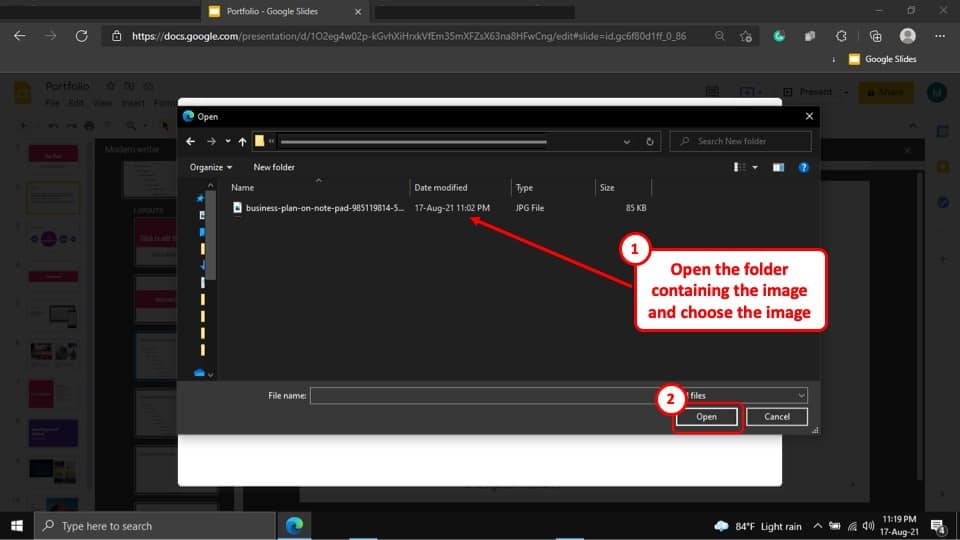
In this stride, all you have to practice is to select the paradigm that you want to add as a background on the slide and select the "Open up" button at the bottom right of the pop-upwardly window.
Step-6: Select the "Done" button
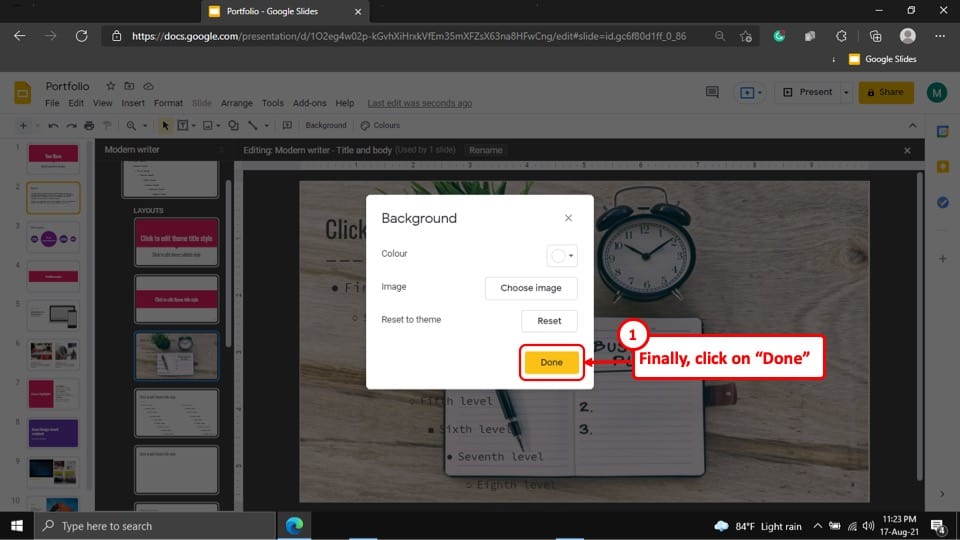
In the concluding step, all you take to practice is select the orangish "Washed" button at the lesser right corner of the popular-up window.
At present you tin leave the "Theme Builder", and when you choose this layout, you will accept an image in the groundwork of the slide.
If you always want to delete this image, get dorsum to the theme builder, locate the specific layout containing the image on the slide, select the prototype and simply delete it.
Method two – Directly as the Slide Background
If you don't desire to mess with the slide layouts, some other method to add an epitome to the slide is by simply adding it direct to the slide as a background. Hither's how you can do it –
Step-1: Open the "Change Background" options
The first step is to simply select the slide and right-click on it. From the options that appear, choose the "Alter Background" selection.
Step-2: Click on the "Choose an Image" option
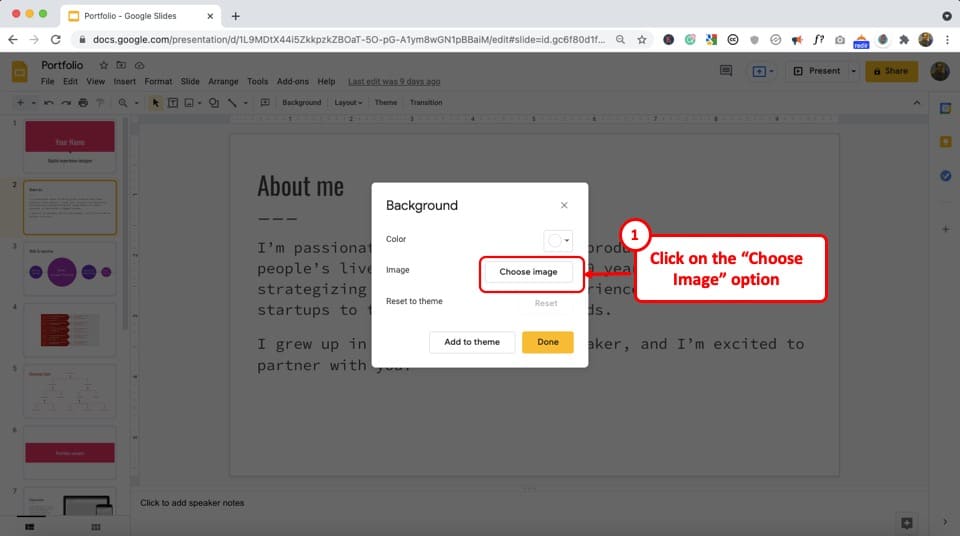
Now, every bit we did before in the commodity, click on the "Choose Image" selection.
Stride-3: Click on the "Scan" option
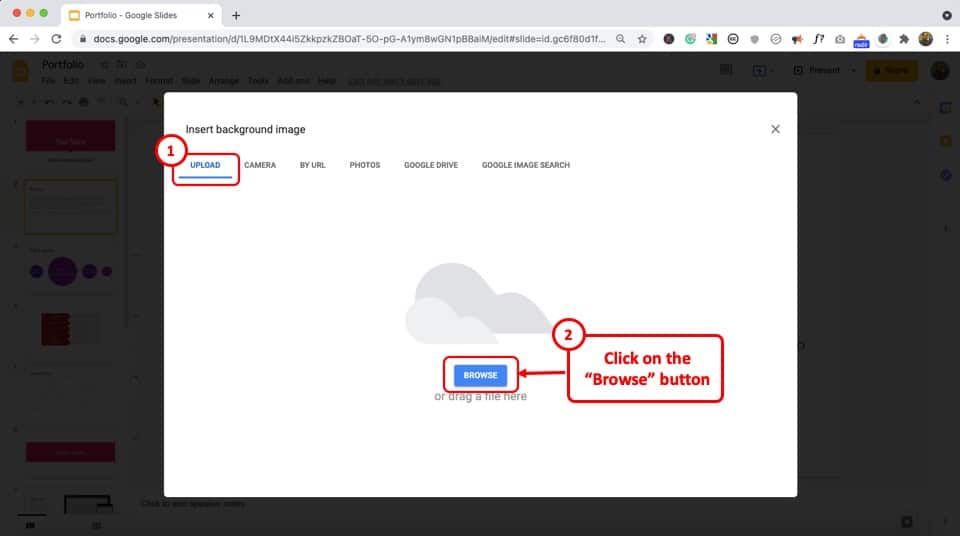
When you click on the "Choose Image" option, a new window volition pop upwardly.
Make sure that you are on the "Upload" tab on the top. Then, click on the "Browse" push in blue in the middle of the screen.
Step-iv: Choose and Upload the Image
Navigate to the respective folder where you take saved the picture on your computer. Then, click on the image file to select information technology and click on the "Open" button.
This will begin the process of calculation the paradigm as the background of your slide.
Footstep-5: Click on "Done"
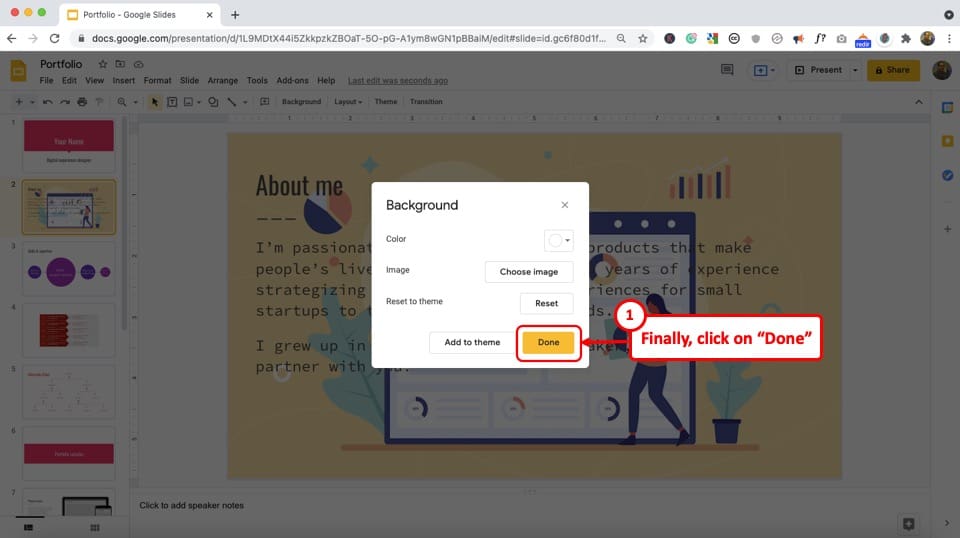
The last footstep is to click on the "Done" push.
This will add the image to your slide background of a single slide.
Method iii – Insert an Image to the Slide
Some other manner you can add an image to the background of your slide is to insert an image to the slide instead of adding information technology to the slide background.
This might sound a scrap confusing at first, only there is a slight difference. Adding an image to the slide allows y'all to format the image. Whereas, when an paradigm is added directly to the slide background, you lot tin can't make any changes to it.
Here'due south what yous need to exercise –
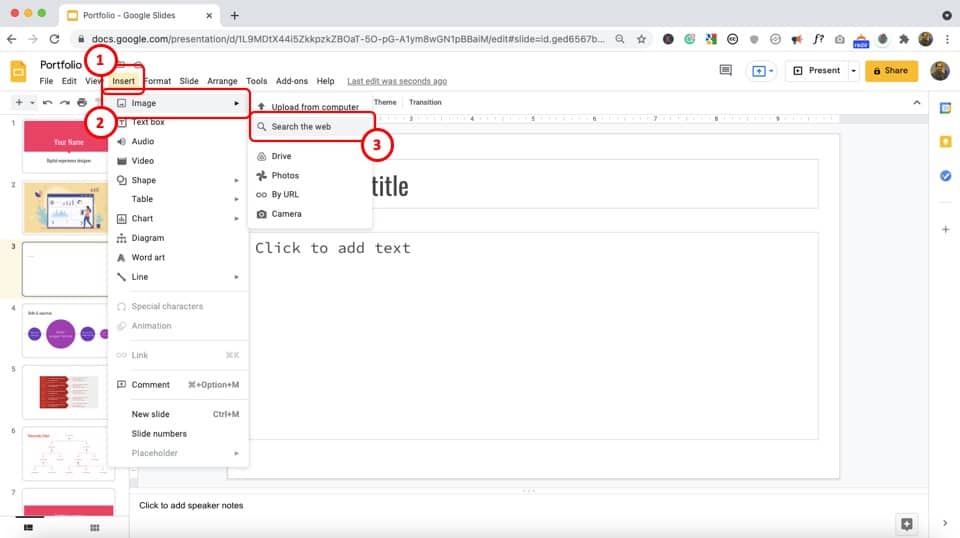
Step-1: Choose the "Insert Paradigm" option
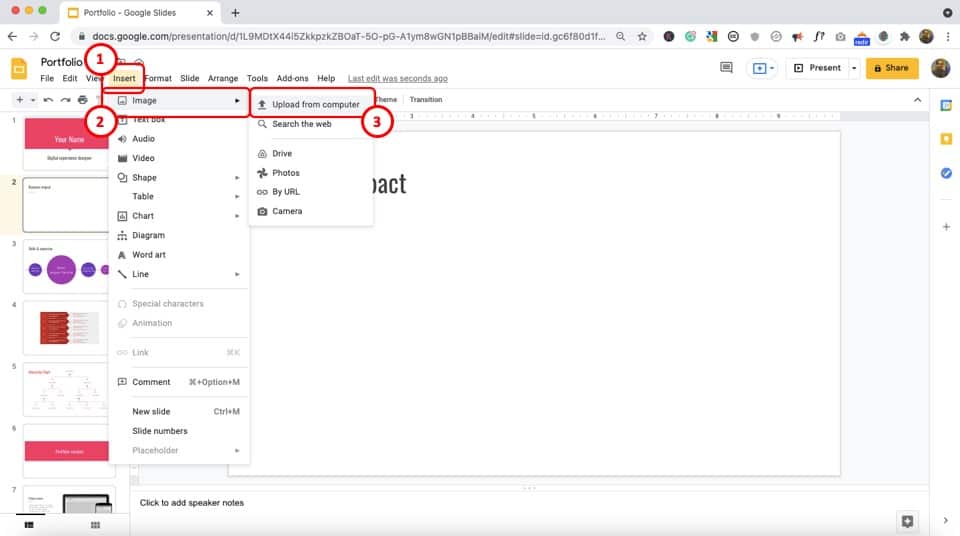
Click on the "Insert" tab. From the dropdown card that appears, click on the "Image" option. Then, select the "Upload from computer" if you take the epitome saved on your computer.
Step-2: Upload the Image to the Slide
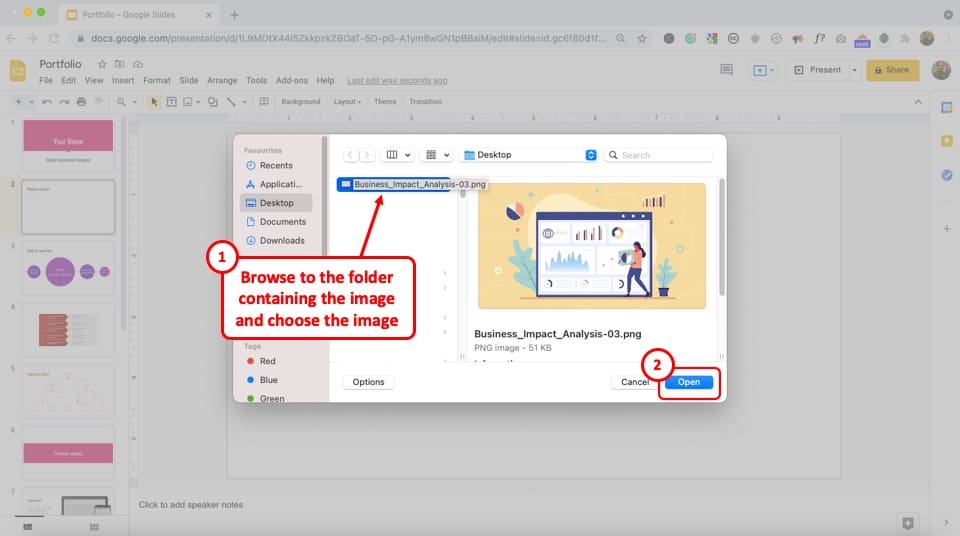
Next, navigate to the folder that contains the image. Click on the epitome to select information technology, and then click on "Open".
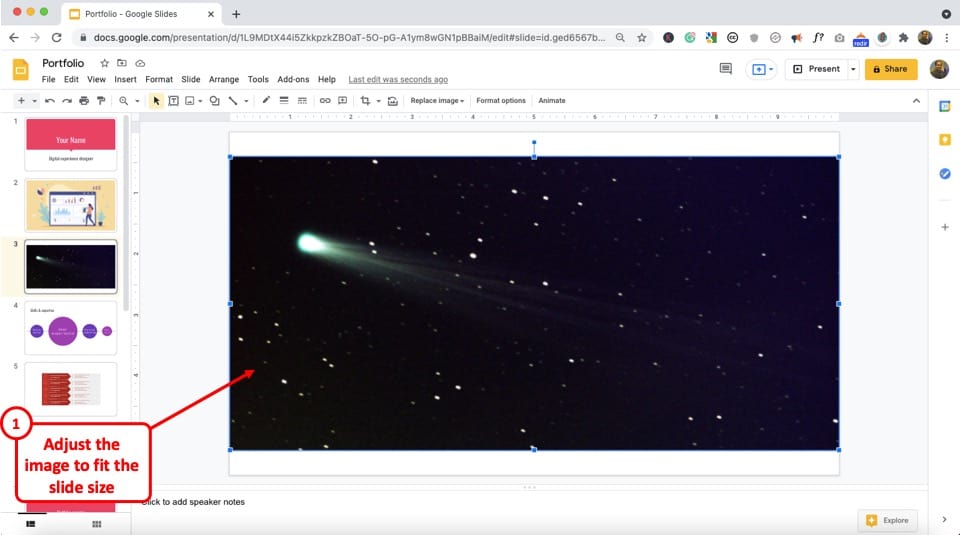
Step-3: Brand the Image fit the Slide
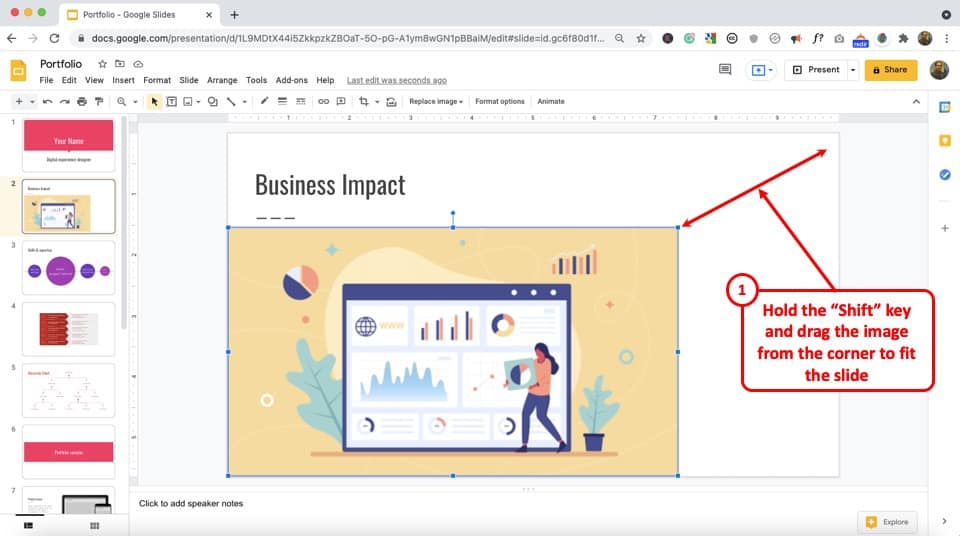
Once the image has been added to your Google Slides presentation, now yous need to make it fit full screen.
To do that, concord the "Shift" key on your keyboard and drag the image from 1 corner until it becomes at least as large as the slide. If the prototype is going beyond the slide, feel free to utilise the crop function.
Step-4: Transport the Image to Dorsum
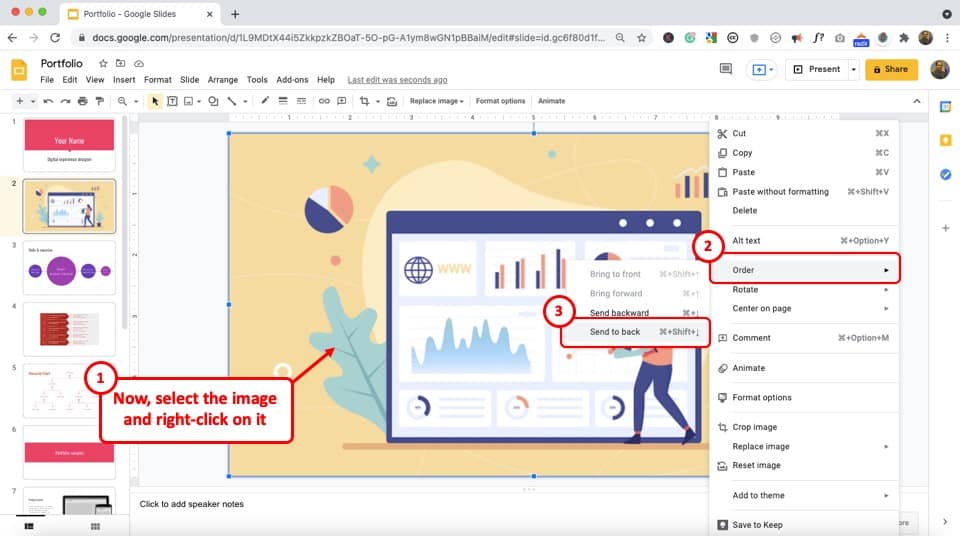
Now, once the image has been made to fit the slide, the next affair that you need to do is send the epitome to the back so that y'all can access the text and other elements present on the slide.
To do that, simply correct-click on the image. Then, from the options, click on "Order", and choose the "Send to back" selection.
This will immediately make the epitome layer the base layer and transport it to the back, and turn the image as the groundwork of the slide.
4. How to Add Moving Images as Background in Google Slides?
You can also add together moving images as groundwork in Google Slides. Yous can exercise then by using the GIF files that allow blitheness in images.
Here's how to add moving images as background in Google Slides –
Step-i: Insert a GIF File from the Spider web
The showtime step is to insert a GIF file in your Google Slides presentation.
If you already have a GIF file on your computer, you can browse to the specific binder of your reckoner and insert information technology to the slide.
Alternatively, yous can search a GIF file and insert it direct from the web.
Click on the "Insert" tab. So, click on the "Image" choice and from the next menu, select the "Search the spider web" option.
Step-ii: Search and Insert a GIF File
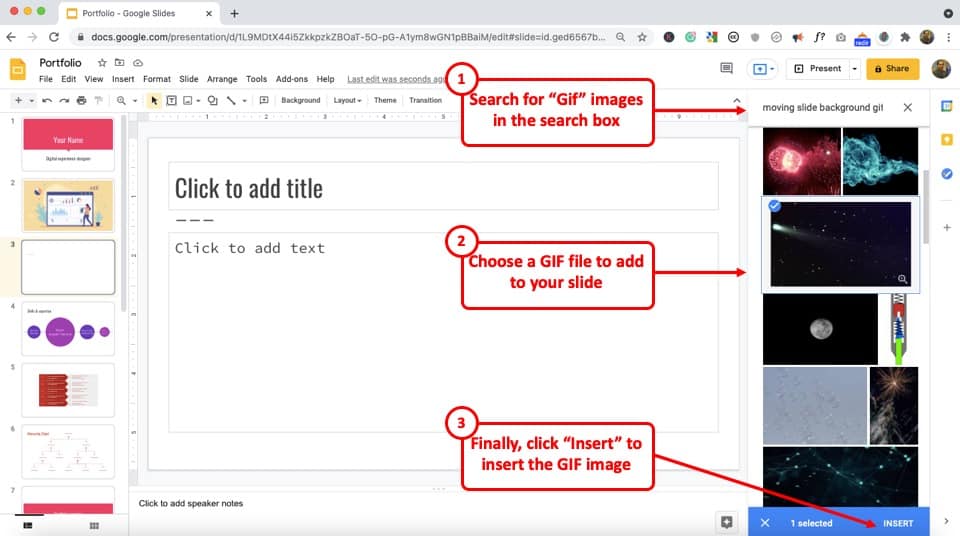
Now, you volition come across a window pane on the right part of the screen.
Search for a GIF file on the web. Look for an epitome that you like and click on information technology to select it. Once you click on the image, you volition see an option to insert information technology on the slide.
Click on the "Insert" option to add the image to the slide.
Step-3: Stretch the GIF file to Fit the Slide
Some images may not match the size of your slide in Google Slides. So, yous may need to adjust the size of the image.
To do that, press the "Shift" fundamental on your keyboard and drag the prototype from any one corner such that the image is larger than the size of the file.
And so, utilise the ingather function by correct-clicking on the prototype, and selecting "Crop". Make the image fit the slide by adjusting the ingather handles.
Step-4: Ship the Image to Back
The concluding step is to send the prototype to the back of the slide. To do that, simply right-click on the image. From the menu that opens upward, click on "Order", and and so click on the "Send to Back" option.
This volition add together an animated picture to the groundwork of your slide in Google Slides.
5. How to Change Background Prototype Transparency in Google Slides?
If you want to adjust the transparency of the epitome to be used in the background, you will need to insert the epitome on the slide and then put it in the groundwork instead of directly adding the image as the slide background (equally described in method three in a higher place).
To change the Background image transparency, you take to "Correct-click" on the epitome, select the "Format options" in the drop-down carte and change the transparency level from the "Adjustment" tool in the "Format choice" sidebar that will announced on the right of your screen.
Check out my other article where I describe the procedure on how to change the transparency of background images in Google Slides! Click on the link to read that article.
6. How to Remove Prototype from Background in Google Slides?
To remove an epitome from the background in Google Slides, simply select the slide and right-click on it. Then, select the "Change Background" option. Next, click on the "Colour" option and select the "White Color" from the dropdown.
The process is shown below in a step-by-step method –
Step-one: Open up the "Change Background" settings

Select the slide from which you lot want to remove the groundwork image. Right-click on information technology and click on the "Alter Background" option.
Pace-2: Click the "Reset" choice
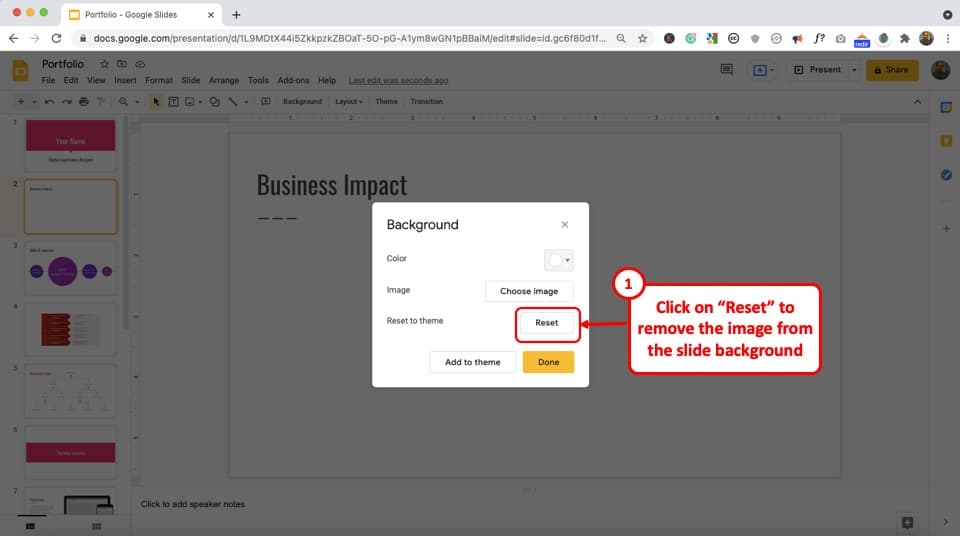
A new window volition pop-up.
In this window, click on the "Reset to theme" choice. This will remove the epitome from the background of the slide.
7. How to Alter Background Image of Slide in Google Slides?
Irresolute the groundwork image of slides in your Google Slides presentation is identical to adding an image as the background of a slide.
To change the background prototype of the slides, simply follow the steps describing how to add together an image as the background of a slide, earlier in this article.
viii. How to Change Groundwork Color of Text Box in Google Slides?
The process of changing the background color of text boxes in your Google Slides presentation is explained in piece of cake steps beneath.
Step-one: Select the text box
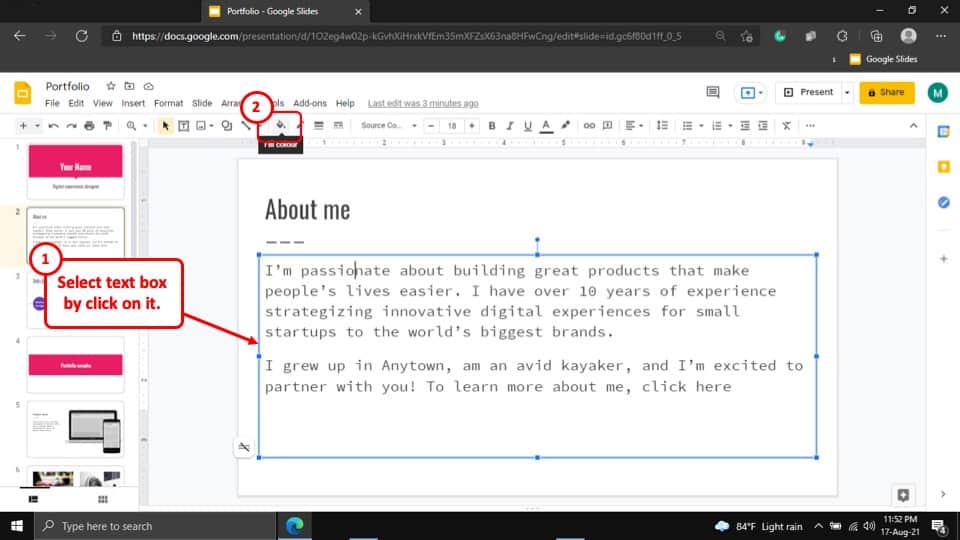
The first pace to changing the groundwork color of a text box in your Google Slides presentation is to click on the text box.
After you click anywhere in the text box, the edge of the text box volition become blueish. This means the text box has been selected.
Pace-2: Click on the "Fill Color" push button
After you have selected the text box, click on the "Fill color" tool located in the editing toolbar under the ribbon of your Google Slides presentation. The icon of the "Fill Color" tool is of a reclined bucket of paint.
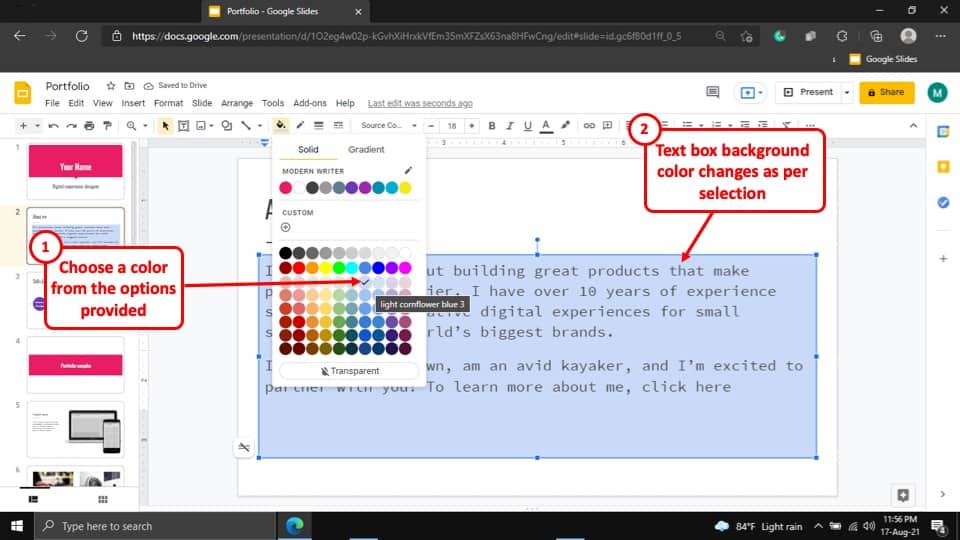
Step-3: Select your preferred color
Later on you have selected the "Make full Colour" tool, a drop-downwards carte will appear on your screen.
In this final step, simply select the color y'all prefer every bit a background color for the text box and the groundwork color of the text box will change accordingly.
More Related Articles
- How to Edit Themes in Google Slides? The Complete Guide!
- How to Edit Text in Google Slides? [A Complete Tutorial!]
- How to Hyperlink in Google Slides? A Footstep-by-Footstep Procedure!
- How to Make a Re-create of Google Slides? [Here'south an Easy Method!]
- Google Slides Add-Ons: A Helpful Guide! [with Top five Add-ons!]
Credit to diana.grytsku (on Freepik) for the featured image of this commodity (further edited).

Source: https://artofpresentations.com/change-background-in-google-slides/
Posted by: pattersonackwoure.blogspot.com
0 Response to "How To Change Background Color In Google Slides"
Post a Comment